
Upgrading from an HDD to an SSD is one of the best investments you can make for your desktop or laptop computer.
Upgrading from a hard disk drive (HDD) to a solid-state drive (SSD) is one of the most effective ways to improve PC performance. Faster boot times, quicker app launches, and a more responsive system are all immediate benefits. However, many users hesitate to upgrade because they assume it requires reinstalling Windows, applications, and reconfiguring everything from scratch.
Why Migrate Instead of Reinstalling Windows?
Migrating your existing system to an SSD allows you to keep your current Windows installation, programs, files, and settings intact. Instead of starting over, you simply transfer everything from your old drive to the new one, saving time and avoiding the hassle of reinstalling software or restoring backups.
This approach is especially useful if your system is already set up the way you like it or if you rely on applications that are difficult to reinstall or reconfigure. When done correctly, migration preserves your environment while delivering the performance benefits of an SSD.
In the sections below, we’ll explain what you need to prepare, how the migration process works, and what to watch out for to ensure a smooth transition without data loss.
Before You Migrate: Quick Checklist
Before migrating your system from an HDD to an SSD, take a few minutes to make sure everything is ready. Proper preparation helps prevent data loss and avoids common issues during the process.
- Back up important data
Even though migration is designed to preserve files, having a recent backup protects you if something goes wrong. - Confirm SSD capacity
Make sure the SSD has enough space to hold all data from your current system drive, including Windows, applications, and files. - Check drive connections
Ensure the SSD is properly connected to your system, either internally or via a USB-to-SATA adapter if you’re using a laptop. - Clean up unnecessary files
Removing unused programs and large files can speed up the migration and reduce the chance of errors. - Update Windows and drivers
Running the latest updates helps avoid compatibility problems during and after migration.
Once these steps are complete, you’re ready to begin migrating your system to the SSD.
Using EaseUS Todo Backup
If you want to migrate all your data without reinstalling Windows, you’ll need help from a 3rd party software. EaseUS Todo Backup is among the best solutions out there, and its user-friendly interface makes migration fairly easy. Here’s what you need to do.
1. Clean up Your HDD
If you have a large HDD, you risk not having sufficient space on the SSD. If this is the case, the first thing you need to do is clean up your HDD. You probably don’t need all the files that are stored in it, so remove everything that you don’t want to see on your SSD.
You can use Windows’ built-in Disk Cleanup feature to remove clutter and delete everything else you don’t need manually.
2. Update the SSD’s Firmware
To ensure complete compatibility with your computer and minimize the risk of data loss, you need to update your SSD’s firmware. The method can vary. Sometimes you’ll need to flash the firmware by restarting your computer with a dedicated CD, and sometimes you’ll be able to do it from within Windows.
You can check the manufacturer’s website for detailed instructions and just follow the steps. Once you’ve done this, you can safely migrate all data to your new SSD.
3. Use EaseUS Todo Backup to Clone Your HDD
You can download EaseUS Todo Backup from the official website. Download, install, and run the program.
On the main screen, select the Clone option. The first thing you’ll have to do is select the source drive. If there are multiple partitions, select all of them and click Next. Now choose your new SSD as the destination drive. You should also select the Optimize for SSD option, as this will ensure the best performance for your new drive.
To see what the result will look like, click Edit. You probably won’t have to change anything here, but you can do some tweaking if necessary. After that, click Next to start the procedure. When it’s done, click Finish.
4. Replace Your HDD with an SSD
After the migration process is over, turn off your computer. Then, disconnect the HDD and connect your new SSD in its place. You likely won’t have to do any BIOS tweaking, as Windows will load directly from the SSD.
Once your computer has booted, open Computer Management (you can find it in the Start menu), then go to Disk Management. Locate your old HDD, right-click on its partitions and click Delete Volume to remove each of them. You’ll have successfully completed the migration process.

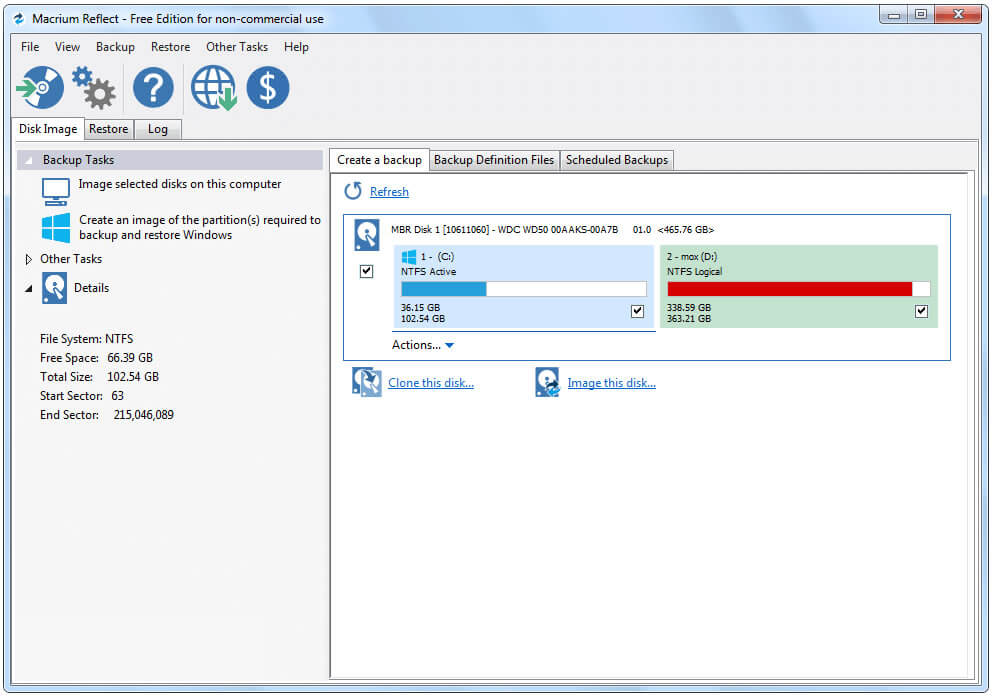
Using Macrium Reflect
Macrium Reflect is another popular choice when it comes to migrating data. It makes the migration process easy and doesn’t require a lot of technical knowledge. Here are the steps to follow:
1. Download and Install Macrium Reflect
Luckily, there’s a free version of Macrium Reflect that’s capable of letting you migrate all your data. Go to the Macrium Reflect download page, then choose ‘Home Use’. After the download is complete, run the installer.
The first thing you might notice is that the installer doesn’t look like a standard tool. This is because it’s not. Instead, it’s a download agent from which you install the program. Leave all the options you see as they are and click Download.
2. Set up the Clone
Now you can make a copy of your HDD on the SSD. Just click Clone this disk under the drive containing all your data, and when the pop-up screen shows up, click the Select a disk to clone to and choose your SSD.
If you have multiple partitions, just select all of them and click the Copy selected partitions button. In case you get the ‘Not all copied. Insufficient space.’ message even though there’s enough room on the SSD, just manually copy every partition separately, saving the biggest one for last.
3. Activate the Clone
Once you’re done with the previous step, Macrium Reflect will show you a detailed overview of all the processes to come. You can change these, but in most cases, there won’t be any need for that, so you can just click Finish to start the process.
Depending on the amount of data, this can take anywhere from a few minutes to a few hours. It’s best that you let Macrium Reflect do its job overnight, and everything should be ready until you wake up.
When the process is over, shut down your computer, replace your old HDD with the SDD, and boot the computer. Same as the previous method, it should boot automatically, but if it doesn’t, you can go to BIOS to fix any mistakes.
A Faster PC Without Starting Over
Migrating from an HDD to an SSD doesn’t have to be complicated or disruptive. With proper preparation and the right steps, you can dramatically improve system performance while keeping your operating system, applications, and files exactly as they are.
Taking the time to back up your data, verify compatibility, and follow the migration process carefully helps avoid common pitfalls. Once the migration is complete, you’ll benefit from faster startup times and a more responsive PC — without the need to reinstall Windows or rebuild your system from the ground up.