Two Methods for Optimizing Check Disk Countdown Time in Windows
Seeing a CHKDSK countdown screen during Windows startup can be confusing and, at times, frustrating. Instead of booting normally, Windows pauses to scan your disk for errors, often displaying a countdown timer before the check begins. While this process is meant to protect your data, frequent or unexpected CHKDSK runs can raise questions about what’s happening behind the scenes.
Why Windows Runs CHKDSK at Startup
CHKDSK is a built-in Windows utility designed to scan hard drives for file system errors and physical disk issues. Windows may schedule it to run at startup if it detects improper shutdowns, file system inconsistencies, or signs of disk problems. The countdown gives users a chance to skip the scan, but doing so repeatedly can allow underlying issues to worsen.
In some cases, CHKDSK runs more often than necessary due to configuration settings, system errors, or lingering flags that were never cleared. While disk checks are important for maintaining data integrity, repeated startup scans can slow down boot times and disrupt normal use.
Understanding why CHKDSK is triggered and how to manage or optimize its behavior can help you strike the right balance between disk health and startup performance. Below, we’ll explain what causes the CHKDSK countdown and how to address it safely.
Optimizing Chkdsk Countdown Time in Command Prompt
Using the Command Prompt method is a quick and easy way to set chkdsk countdown time that fit your preferences. This is a system setting so you need to access Command Prompt as an administrator.
Here’s how to do it:
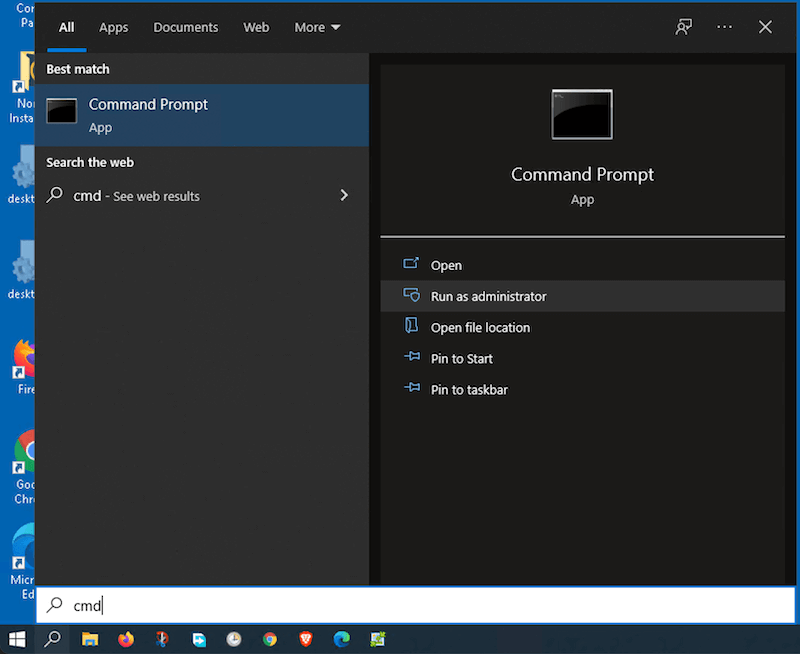
1. Launch Command Prompt
Type cmd in the Start menu search bar, then right-click Command Prompt. Now, select the Run as administrator option, which gives you the required rights to change the countdown times.
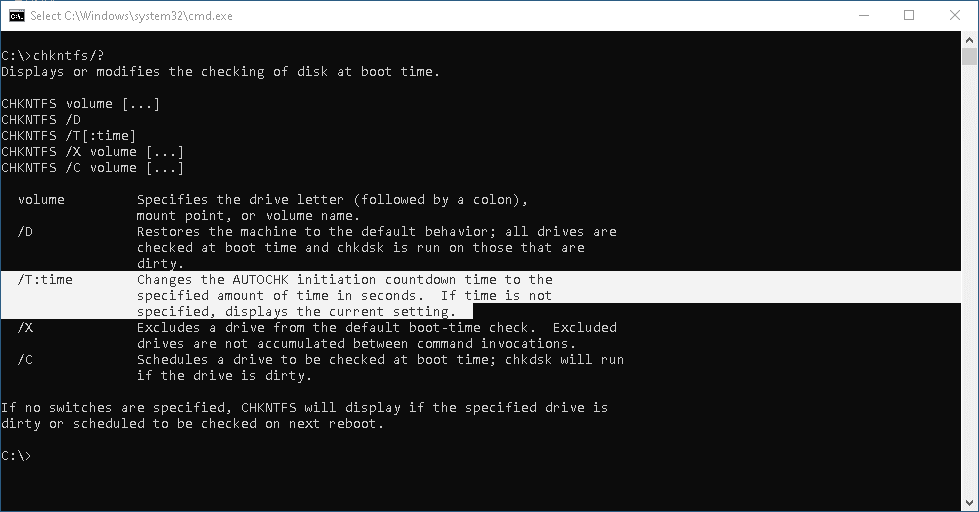
2. Issue chkntfs / t: <seconds> command
Paste or type chkntfs / t:<seconds> into Command Prompt. <seconds> is the number of seconds for the countdown times. For example, type 15 instead of <seconds> if you want the Check Disk timeout to be 15 seconds.
Note: You can set the number of seconds anywhere from 1 to 259,200. The default settings are usually 8, 10, or 30 seconds.
3. Hit Enter
There is no Command Prompt response after you hit enter but that doesn’t mean you haven’t changed the settings. To check, use this command: chkntfs /t
Tip: If you want to revert to the default settings, execute the chkntfs / t:8 command. Of course, you can also use 10, or 30 seconds – whichever works best for you.
Optimizing Check Disk Countdown Times with Registry
The other tool which allows you to tweak chkdsk countdown times is Windows Registry. This method lets create and edit a registry value which changes the Check Disk timer.
Nobody’s perfect, so some mistakes might occur while editing the registry. This is why it is important to back up the registry before you play around with it.
Take the following steps to change chkdsk countdown times in the registry:
1. Access Windows Registry
Look for regedit from the start menu, right-click on the Registry, then choose Run as administrator.
2. Go to the Following Location
HKEY_LOCAL_MACHINE\SYSTEM\CurrentControlSet\Control\Session Manager
This takes you to the place in Windows Registry where you can change the chkdsk timer.
Tip: If you are a Windows 10 user, there is no need to type the location or search through the menus step by step. Just copy and paste the location into the Registry Editor address bar and you’ll immediately get to the target destination.
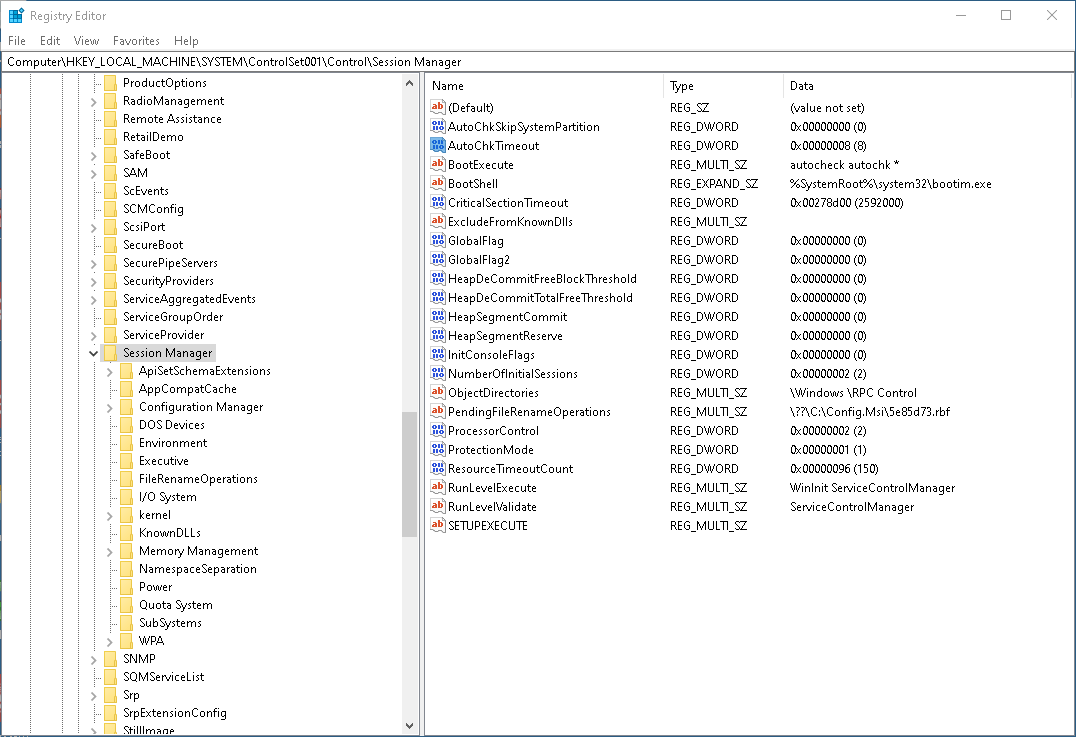
3. Find AutoChkTimeout
Scroll down the Registry panel on the right to locate a value named AutoChkTimeout.
Note: There is a possibility you might not find the AutoChkTimeout value. In that case, right-click on the panel and choose New -> DWORD (32-bit) Value. Type AutoChkTimeout as the value name and hit Enter to confirm.
4. Launch the Edit Value Window
Simply double-click AutoChkTimeout and the Edit Value window pops up. First, you need to check the Decimal option under the Base section. Then type the desired number of seconds into the Value data field and click OK to save.
Restart your PC to initiate the changes and the chkdsk timer will be set to your preference from there on.
How to Cancel Check Disk in Windows
Windows Check Disk is a great tool indeed, but you might not want it to run on every startup. To abort the check-up, press any key while booting Windows to prevent Check Disk from engaging. But this action doesn’t actually cancel the scheduled tasks.
If you want to cancel a scheduled check-up, the easiest way to do it is in Command Prompt. Open Command Prompt and run as an administrator. Enter the chkntfs /x c: command and press Enter to cancel.
Note: The c in the command line represents the hard drive letter. You can put any other letter that corresponds to your hard drive/s.
Keeping Disk Checks Helpful, Not Disruptive
CHKDSK plays an important role in maintaining file system health, but it shouldn’t interfere with everyday use. If disk checks run too often, it may indicate deeper issues such as improper shutdowns, file system corruption, or early signs of drive trouble that need attention.
By addressing the underlying causes and ensuring your system is properly maintained, you can reduce unnecessary CHKDSK runs while still protecting your data. Regular backups, proper shutdowns, and proactive disk maintenance help keep Windows startup smooth and predictable — without sacrificing disk reliability.