
Need to resize a hard drive partition in Windows without losing data? Windows includes built-in tools that let you shrink or extend partitions safely, as long as you prepare your drive first.
Partition resizing can help you fix low disk space warnings, reclaim unused storage, or reorganize space on an HDD or SSD without reinstalling Windows. The key is knowing when resizing makes sense, which tool to use, and what steps to take before changing your drive layout.
Resize a Hard Drive Partition in Windows Without Losing Data
To resize a Windows partition without losing data, you need enough available space, a healthy file system, and a clear understanding of which partition you want to change. Windows can shrink a partition to create unallocated space or extend a partition when unallocated space is available in the right location.
This process is usually safe when done correctly, but it still changes how storage is organized on your drive. Before you resize a hard drive partition, back up important files, close active programs, and check the drive for errors. These simple precautions help reduce the risk of failed resizing, data loss, or startup problems.
When Should You Resize a Windows Partition?
You may need to resize a Windows partition when one part of your drive has too little space while another has room to spare. This often happens when the C: drive starts filling up with Windows updates, apps, and system files.
Resizing can also help when you want to create space for a new partition, organize files more clearly, or make better use of storage after upgrading your drive. The goal is simple: give each partition the amount of space it actually needs.
Before You Resize: Quick Safety Checklist
Before you resize a Windows partition without losing data, take a few minutes to prepare your system. These steps help prevent common errors and make the process smoother.
- Back up important data
Copy critical files to another drive, cloud storage, or external backup location. - Check available free space
Make sure the drive has enough free or unallocated space for the change you want to make. - Verify drive health
Run a disk check before resizing to catch file system errors early. - Close active programs
Shut down apps that may be using the partition you want to resize. - Confirm the correct partition
Double-check the drive letter and partition size before applying any change.
Do not skip the backup step. Resizing is usually safe, but no partition change is risk-free.
Common Mistakes That Can Cause Data Loss
Most partition resizing problems happen because the process gets interrupted or the wrong partition gets changed. Avoiding these mistakes can help you resize a hard drive partition without losing data.
- Do not restart or shut down your PC while resizing is in progress.
- Do not resize the wrong volume. Always check the drive letter first.
- Do not ignore disk errors. Fix file system problems before resizing.
- Do not let your PC sleep or hibernate during the operation.
- Use stable power. A power failure during resizing can damage data.
If you are resizing a system or boot partition, take extra care. A mistake there can stop Windows from starting correctly.
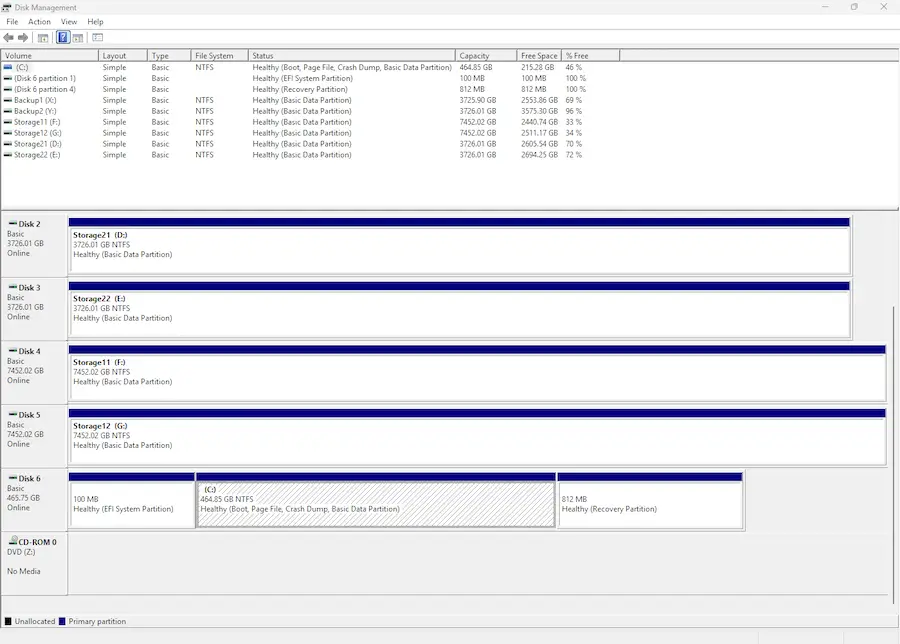
How to Resize a Partition with Disk Management
Disk Management is the easiest built-in Windows tool for shrinking or extending partitions. It works well for common resizing tasks and does not require command-line knowledge.
Open Disk Management
Right-click the Start button and choose Disk Management. You can also search for Create and format hard disk partitions from the Start menu.
Choose Shrink Volume or Extend Volume
Right-click the partition you want to resize. Choose Shrink Volume to make it smaller, or choose Extend Volume to make it larger.
Important: Windows can only extend a partition if unallocated space is available in the correct location.
Apply the Partition Change
Enter the amount of space you want to shrink or extend, then confirm the change. Windows will apply the resize based on the space available.
Note: If you are shrinking the C: drive, Windows may limit how much space you can remove because of system files that cannot be moved.
How to Resize a Partition with DiskPart
DiskPart is a command-line tool for advanced partition management. It gives you more direct control, but it also leaves less room for error. Use it only if you are comfortable working in Command Prompt.
Open Command Prompt
Type cmd in the Start menu, right-click Command Prompt, and choose Run as administrator. Then enter:
diskpartSelect the Correct Partition
Use DiskPart commands to list your disks and partitions, then select the correct one. Be careful here, because selecting the wrong partition can lead to serious problems.
list disk
select disk 0
list partition
select partition 1
Extend the Partition
To extend the selected partition into available unallocated space, use:
extendNote: DiskPart can only extend a partition when suitable unallocated space is available. If there is no unallocated space next to the partition, the command may fail.

Can You Resize the C: Drive Without Losing Data?
Yes, you can usually resize the C: drive without losing data, but the process depends on your current disk layout. If you want to shrink C:, Windows needs enough free space inside the partition. If you want to extend C:, unallocated space usually needs to be directly next to it.
This is where many users get stuck. If the Extend Volume option is grayed out, Windows likely cannot use the available space because another partition sits between C: and the unallocated space.
Before changing the C: drive, back up your data and make sure Windows has no pending updates or disk errors. Since C: contains system files, mistakes can affect startup and overall stability.
What If Windows Won’t Let You Extend or Shrink a Partition?
Sometimes Windows blocks a resize even when the drive appears to have enough space. This does not always mean something is wrong. It often means the layout or file placement prevents the change.
- No adjacent unallocated space may prevent extending a partition.
- System files may limit how much you can shrink the C: drive.
- File system errors can block resizing until repaired.
- Recovery partitions may sit between the partition and free space.
- Low free space can prevent Windows from completing the operation.
Start by cleaning up unnecessary files, checking the drive for errors, and reviewing your partition layout. In many cases, that will explain why Windows cannot complete the resize.
Resizing Windows Partitions Safely
Resizing a Windows partition can solve storage problems without reinstalling the operating system. Whether you need to shrink a partition, extend a partition, or adjust the C: drive, preparation matters more than speed.
Back up your files, confirm the correct partition, and avoid interruptions while Windows changes the drive layout. With the right approach, you can resize a hard drive partition without losing data and keep your system running smoothly.
Can System Mechanic Change Disk Partition Size in Windows?
No. System Mechanic does not resize, shrink, extend, or create Windows disk partitions. To change partition size, use Windows tools such as Disk Management or DiskPart, or another dedicated partition management utility.
What System Mechanic can do is help keep your PC and storage running efficiently after your partitions are set up. It can clean out unnecessary files, optimize system performance, help improve startup speed, and address issues that may slow down your computer over time.
In short: use Windows partition tools to change disk size, then use System Mechanic to help maintain performance and keep your system running smoothly.